


Payment terms are essential components of any business transaction, defining when and how customers should pay their invoices. Odoo 19 Accounting provides a flexible and intuitive system for creating customized payment terms that match your business needs. Whether you need simple net-30 terms, partial advance payments, or early payment discounts, Odoo 19 makes it easy to configure and manage these conditions. This guide will walk you through the complete process of setting up payment terms in Odoo 19, including practical examples that you can implement immediately in your accounting workflow.
Understanding Payment Terms in Odoo 19
Payment terms define how and when your customers are expected to pay their Invoices, allowing you to manage cash flow, schedule payments, and apply discounts or advances efficiently within Odoo 19 Accounting.
Why Payment Terms Matter for Cash Flow and Invoicing
Payment terms in Odoo Accounting define how invoice amounts are split and when they are due. Businesses often use structured terms like Partial advance, Installments, or early payment discounts. Properly configured terms help automate reminders, improve cash flow, and keep customer expectations clear.
In Odoo 19, payment terms connect directly with invoices, customer records, and reporting. This means accurate terms lead to better financial visibility and fewer manual adjustments.
Key Fields You Will Use in Odoo 19
When setting up payment terms in Odoo 19, you will mainly work with description, due term lines, and optional early discount settings. Each payment term includes multiple lines that define how much is due and when. You can also assign a company if you operate in multi company mode. The preview pane on the right shows how the payment schedule will appear on an invoice. This helps you verify that the structure matches your intended payment schedule before saving.
How to Set Up Payment Terms in Odoo 19 Accounting
Step 1: Open the Accounting Module
Log in to your Odoo 19 dashboard and open the Accounting module. This is where you manage invoices, customers, and payment settings. Make sure you have the correct access rights to configure invoicing options. Once inside the module, look at the top menu for configuration settings.

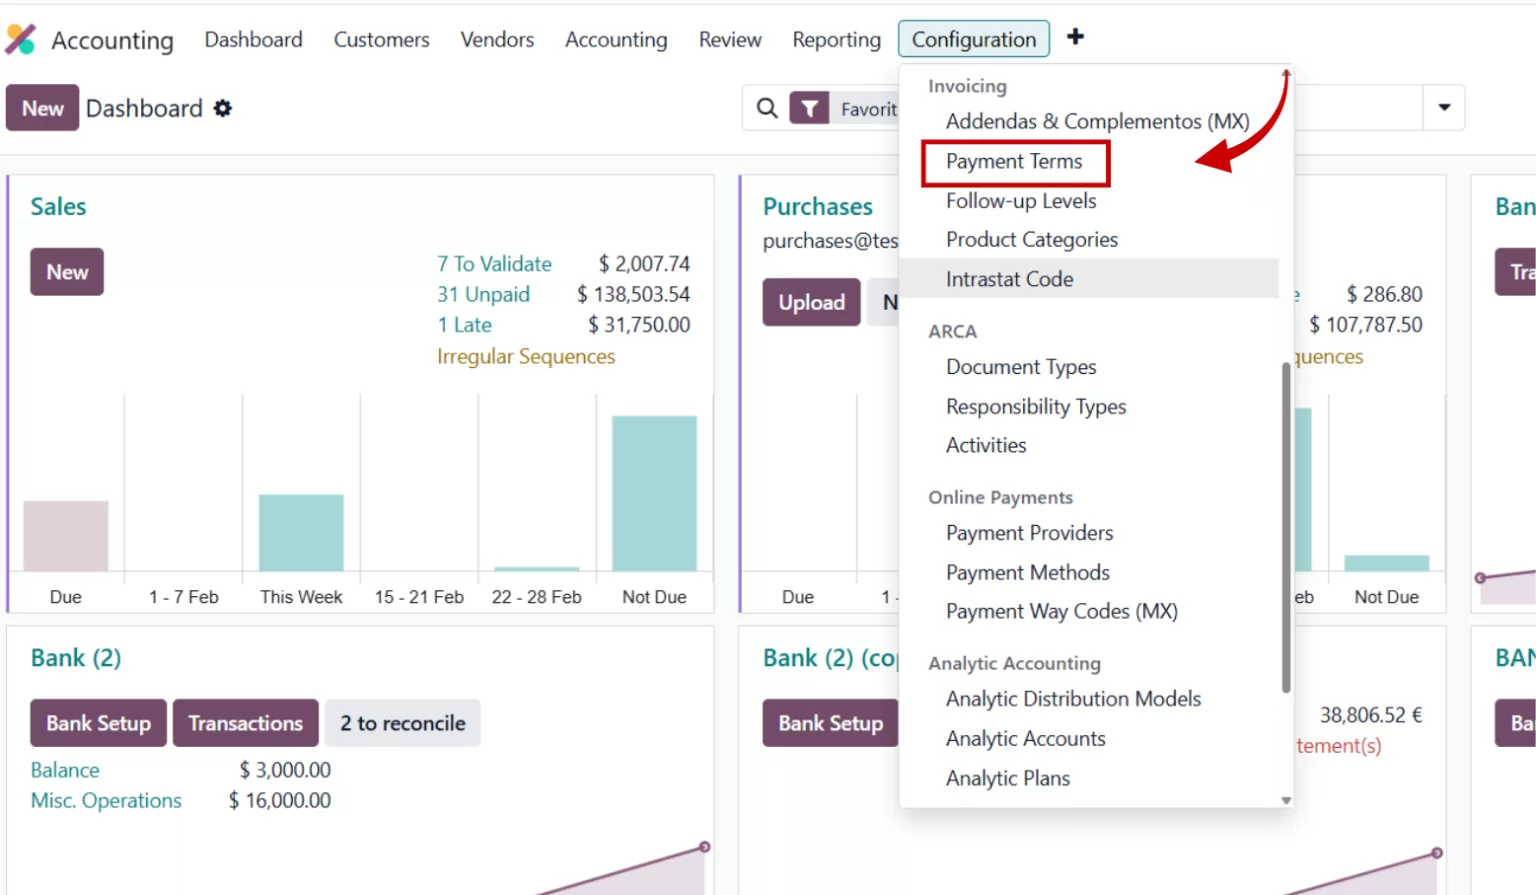
Step 2: Navigate to Configuration and Payment Terms
From the Accounting module, go to Configuration, then select Invoicing, and click on Payment Terms. This section lists all existing payment terms in your system. Here you can edit current terms or create new ones. Click on New to begin creating a fresh payment term for your workflow.
Step 3: Create a New Payment Term
After clicking New, you will see a form where you define the structure of the payment term. Start by adding a clear description. This description appears on invoices, so use a name customers can easily understand. For example, you might write 30 percent advance and balance in 60 days. If you manage multiple companies, assign the correct company to keep records organized.

Step 4: Add Description, Company, and Early Discount Option
Enter the description first. If needed, select the company field. Next, decide if you want to enable the early discount checkbox. If early discount is turned on, you can add the discount percentage and configure tax reduction settings. If it is turned off, you will proceed directly to due terms. This flexibility allows you to create both simple and advanced payment structures in Odoo 19 Accounting.
Step 5: Configure Due Terms and Payment Lines
In the due terms section, add lines that define how much is due and when. Each line includes an amount due and a time period. This is a many to many field in Odoo where you can create multiple payment lines. For example, you might set 30 percent due immediately and the remaining 70 percent due after 60 days. As you add lines, the preview pane updates automatically.
Step 6: Review the Preview Pane and Save
On the right side, the preview pane shows how the payment term will appear on invoices. Review this carefully to confirm the due dates and amounts are correct. Once everything looks accurate, click Save. Your payment term is now ready to use on invoices and customer records.

Practical Example: 30% Advance / Balance 60 Days Payment Term
Let’s create a common payment term where customers pay 30% upfront and the remaining balance after 60 days. In the Description field, enter “30% Advance / Balance 60 Days”. Leave the Early Discount box unchecked. In the Due Terms section, add the first line with 30 percent in the Amount Due field and 0 days in the payment period (meaning due immediately). Add a second line with Balance selected for the Amount Due and 60 days in the payment period. The Preview Pane will show that 30% is due on the invoice date and 70% is due 60 days later. Save your payment term, and it’s ready to use on customer invoices.

Setting Up Payment Terms with Early Discounts
Early payment discounts encourage customers to pay quickly by offering a small percentage reduction. To create a simple early discount term, start a new payment term with a description like “2% Discount if Paid Within 10 Days, Net 30”. Check the Early Discount checkbox. Enter 2 in the discount percentage field and set 10 days as the discount deadline. In the Due Terms section, add a line with Balance for the Amount Due and 30 days as the payment period. The system will automatically calculate that customers can deduct 2% if they pay within 10 days, otherwise the full amount is due in 30 days. The Tax Reduction feature, if enabled, applies the discount before calculating taxes, which can be beneficial depending on your local tax regulations.
Best Practices for Managing Payment Terms in Odoo 19
Tips for Clear Descriptions and Accurate Due Dates
Always use clear descriptions that customers understand. Include details like advance percentage or discount period in the name. Double check due dates and percentages before saving. Accurate payment terms help maintain professional invoicing and reduce disputes.
Common Mistakes to Avoid in Odoo Accounting
Avoid creating duplicate payment terms with similar names. This can confuse your accounting team. Also ensure the preview pane matches your intended structure before saving. Testing payment terms on sample invoices helps catch errors early. With proper setup, Odoo 19 payment terms become a powerful tool for managing invoices and improving financial workflows.
Have questions or need help setting up payment terms in Odoo 19? Talk to us and get expert guidance. Click the button to schedule your Free session today!

